Description
2 pcs. CT-IN-18 Colon Tubes(Separators)
incl. mounting rubber and blue floor lighting
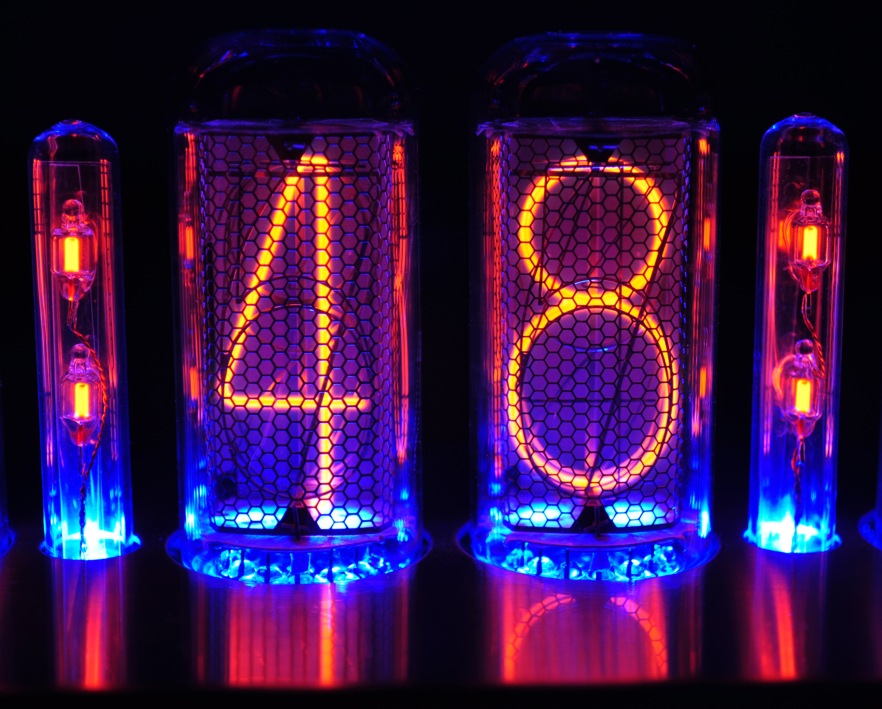
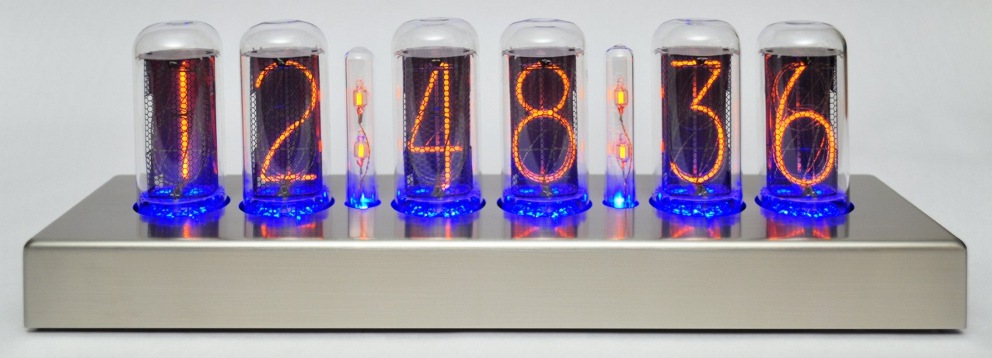
Example of use! Remark: The Nixie clock case and IN-18 Nixie tubes are not part of this offer!
This set (type number CT-IN-18-SET) includes 2 new, CT-IN-18 colon tubes,
2 mounting rubbers and 2 blue LEDs for the floor lighting as shown here:
|
2× |
= |
 |


|
Scope of delivery:
|
|
but also for similar tubes (with digit height 30-50 mm).
For example:
7031, 7032, 7037, B566M, B-7031, B-7032, B-7037, CD94, CD94/GR-211, CV8090, F9090, F9090A, GA12, GR10G, GR10J, GR10J/F, GR-211, LC-631, NL-7037, NL-7038, NL-934, Z5220M, Z522M, Z5660M, Z566M, Z5680M, Z568M, ZM1040, ZM1040T, ZM1042, ZM1042/01, ZM1220, ZM1222.
These colon tubes provide the opportunity to apply the included LEDs at the tube to generate the very impressive floor lighting effect.
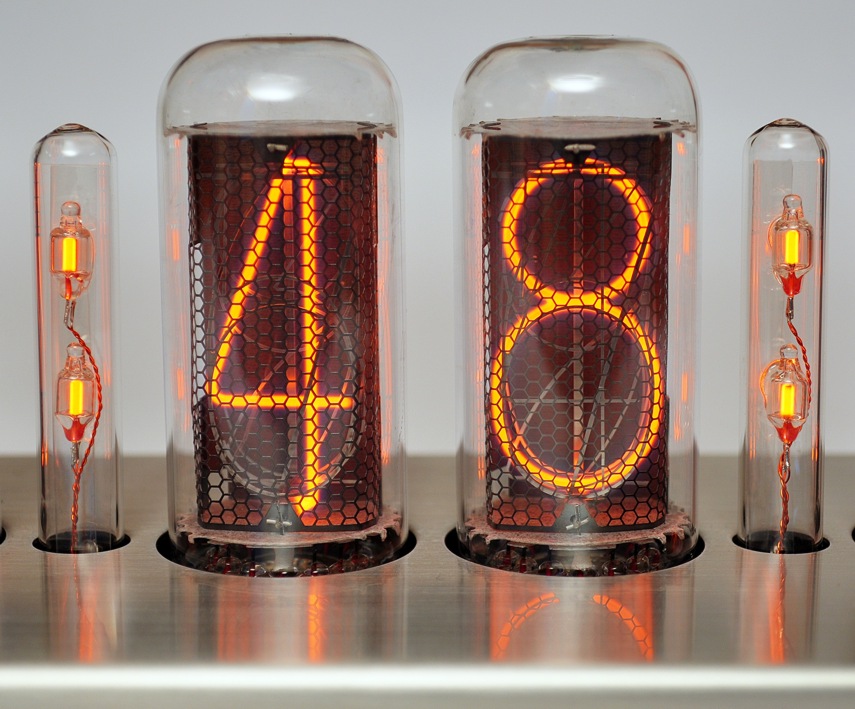 without floor lighting |
|
| Example of use! Remark: The Nixie clock case and IN-18 Nixie tubes are not part of this offer! | |
You can use other LEDs instead of the included blue ones, of course.
Here you see the drawing of the CT-IN-18 colon tube: |
Remarks:
|

| Tube type | CT-IN-18 | |
| dimensions | see drawing | |
| voltage drop | Udrop | 59 V |
| recommended Resistor at 170 V | RV | 180 kΩ |
| nominal current | I | 0.6 mA |
| Terminal assignment | Connection | |
| blue wire | rear upper electrode (+) | |
| red wire | rear lower electrode (+) | |
| black wire | front upper electrode (-) | |
| green wire | front lower electrode (-) |
Mounting notes and floor lighting of colon tube CT-IN-18
The colon tubes can be fastened by using the included mounting rubber. The rubber can be mounted in a hole in a PCB board or in a hole in an assemby board..
Here an example (PCB):


After mounting the rubber, the colon tube can be inseted from the bottom side into the rubber. Note the drawing “Drawing of colon tube CT-IN-18” above for that.
After this, the colon tube can be connected::


If LED floor lighting is to be used for the colon tubes, a LED can be mounted on the front (face side) of the glass. Do NOT illuminate the colon tube from the back side!
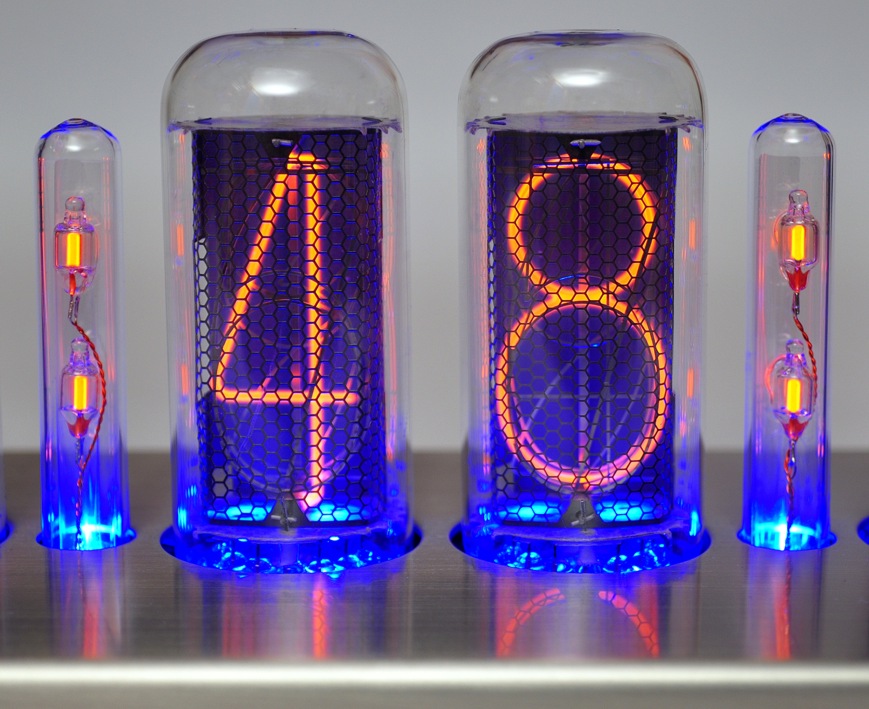
Here you see an example for the illumination of the colon tubes:

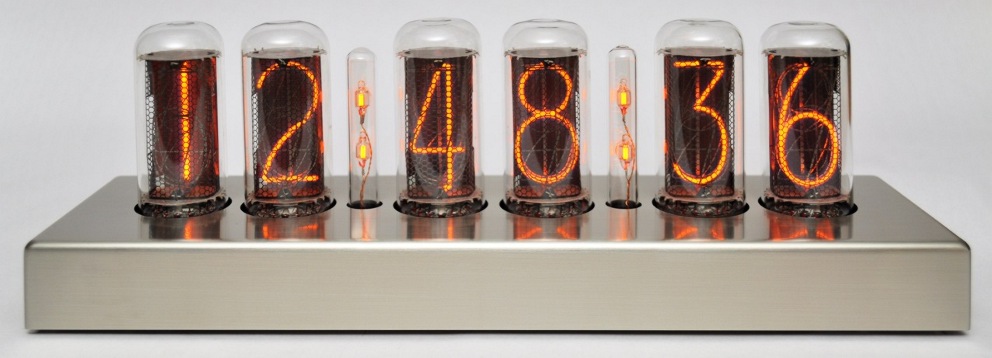
The dots can be switched seperately of course, so that not only a colon is shown but the singel dots (e.g. for the date).
2 dots switched on:


1 dot switched on:


Example of use: Nixie Clock with IN-18 tubes
Remark: The shown clock case and Nixie tubes are not part of this offer!
The clock with blue floor lighting switched on:
Information on product safety
Warn- und Sicherheitshinweise
Der Ein- und Ausbau dieses Ersatzteils darf nur von einem Elektro-Fachbetrieb erfolgen.
Beim Ein- und Ausbau des Ersatzteils sind die Warn- und Sicherheitshinweise des Gerätes zu beachten, in welches das Ersatzteil eingebaut wird.
Warnung! Bei Bruch des Glases können Glassplitter Schnittverletzungen verursachen, deshalb muss beim Umgang mit dem Ersatzteil eine persönliche Schutzausrüstung getragen werden (Schutzhandschuhe, Schutzbrille)
English
warnings and safety instructions
The installation and removal of this spare part may only be carried out by a specialist electrician.
When installing and removing the spare part, the warning and safety instructions for the device in which the spare part is being installed must be observed.
Warning! If the glass breaks, glass splinters can cause cuts, so personal protective equipment must be worn when handling the spare part (protective gloves, safety goggles)
Danish
advarsler og sikkerhedsoplysninger
Installation og afmontering af denne reservedel må kun udføres af et elektrikerfirma.
Ved montering og afmontering af reservedelen skal advarsels- og sikkerhedsanvisningerne for den enhed, som reservedelen er installeret i, overholdes.
Advarsel! Hvis glasset går i stykker, kan glassplinter give snitsår, så der skal bæres personlige værnemidler ved håndtering af reservedelen (beskyttelseshandsker, sikkerhedsbriller)
Bulgarian
предупреждения и информация за безопасност
Монтажът и демонтажът на тази резервна част може да се извършва само от специализирана електрическа фирма.
При монтаж и демонтаж на резервната част трябва да се спазват инструкциите за предупреждение и безопасност на устройството, в което е монтирана резервната част.
Внимание! Ако стъклото се счупи, стъклените трески могат да причинят порязвания, така че трябва да се носят лични предпазни средства при работа с резервната част (защитни ръкавици, предпазни очила)
Finnish
varoitukset ja turvallisuustiedot
Tämän varaosan asennuksen ja irrottamisen saa suorittaa vain sähköalan ammattilainen.
Varaosaa asennettaessa ja irrotettaessa tulee huomioida sen laitteen varoitukset ja turvallisuusohjeet, johon varaosa asennetaan.
Varoitus! Jos lasi rikkoutuu, lasinsirpaleet voivat aiheuttaa viiltoja, joten varaosaa käsiteltäessä on käytettävä henkilökohtaisia suojavarusteita (suojakäsineet, suojalasit)
Estonian
hoiatused ja ohutusteave
Selle varuosa võib paigaldada ja eemaldada ainult spetsialiseerunud elektriettevõte.
Varuosa paigaldamisel ja eemaldamisel tuleb järgida selle seadme hoiatus- ja ohutusjuhiseid, millesse varuosa paigaldatakse.
Hoiatus! Klaasi purunemisel võivad klaasikillud tekitada lõikehaavu, seega tuleb varuosa käsitsemisel kanda isikukaitsevahendeid (kaitsekindad, kaitseprillid)
French
avertissements sur la sécurité du produit et informations de sécurité
Le montage et le démontage de cette pièce de rechange ne peuvent être effectués que par une entreprise électrique spécialisée.
Lors de l’installation et du retrait de la pièce de rechange, les avertissements et les consignes de sécurité de l’appareil dans lequel la pièce de rechange est installée doivent être respectés.
Avertissement! Si le verre se brise, des éclats de verre peuvent provoquer des coupures, il faut donc porter des équipements de protection individuelle lors de la manipulation de la pièce de rechange (gants de protection, lunettes de sécurité)
Irish
rabhaidh sábháilteachta táirgí agus faisnéis sábháilteachta
Ní fhéadfaidh ach sainchomhlacht leictreach suiteáil agus baint na coda breise seo a dhéanamh.
Agus an chuid spártha á shuiteáil agus á bhaint, ní mór treoracha rabhaidh agus sábháilteachta an fheiste ina bhfuil an chuid spártha a shuiteáil a chomhlíonadh.
Rabhadh! Má bhriseann an ghloine, is féidir le splinters gloine a bheith ina chúis le ciorruithe, mar sin ní mór trealamh cosanta pearsanta a chaitheamh nuair a bhíonn an chuid spártha á láimhseáil (lámhainní cosanta, gloiní sábháilteachta)
Italian
avvertenze sulla sicurezza del prodotto e informazioni sulla sicurezza
L’installazione e la rimozione di questo pezzo di ricambio possono essere eseguite solo da un’azienda elettrica specializzata.
Durante l’installazione e la rimozione del pezzo di ricambio, è necessario osservare le avvertenze e le istruzioni di sicurezza del dispositivo in cui è installato il pezzo di ricambio.
Avvertimento! In caso di rottura del vetro le schegge di vetro possono causare tagli, per cui è necessario indossare dispositivi di protezione individuale durante la manipolazione del pezzo di ricambio (guanti protettivi, occhiali di sicurezza)
Greek
προειδοποιήσεις για την ασφάλεια του προϊόντος και πληροφορίες ασφάλειας
Η εγκατάσταση και η αφαίρεση αυτού του ανταλλακτικού επιτρέπεται να πραγματοποιηθεί μόνο από εξειδικευμένη εταιρεία ηλεκτρικών ειδών.
Κατά την εγκατάσταση και την αφαίρεση του ανταλλακτικού, πρέπει να τηρούνται οι οδηγίες προειδοποίησης και ασφάλειας της συσκευής στην οποία είναι τοποθετημένο το ανταλλακτικό.
Προειδοποίηση! Εάν το γυαλί σπάσει, θραύσματα γυαλιού μπορεί να προκαλέσουν κοψίματα, επομένως πρέπει να φοράτε ατομικό προστατευτικό εξοπλισμό κατά το χειρισμό του ανταλλακτικού (προστατευτικά γάντια, γυαλιά ασφαλείας)
Lithuanian
įspėjimai ir saugos informacija
Šios atsarginės dalies montavimą ir išmontavimą gali atlikti tik specializuota elektros įmonė.
Montuojant ir išimant atsarginę dalį, reikia laikytis įrenginio, kuriame sumontuota atsarginė dalis, įspėjimų ir saugos nurodymų.
Įspėjimas! Dūžus stiklui, stiklo šukės gali įpjauti, todėl dirbant su atsargine dalimi reikia dėvėti asmenines apsaugos priemones (apsaugines pirštines, apsauginius akinius).
Latvian
brīdinājumi un drošības informācija
Šīs rezerves daļas uzstādīšanu un demontāžu drīkst veikt tikai specializēts elektrības uzņēmums.
Uzstādot un demontējot rezerves daļu, ir jāievēro brīdinājuma un drošības norādījumi ierīcei, kurā ir uzstādīta rezerves daļa.
Brīdinājums! Ja stikls saplīst, stikla šķembas var izraisīt iegriezumus, tāpēc, strādājot ar rezerves daļu, jālieto individuālie aizsardzības līdzekļi (aizsargcimdi, aizsargbrilles)
Croatian
upozorenja i sigurnosne informacije
Ugradnju i demontažu ovog rezervnog dijela smije izvršiti samo specijalizirana elektrotehnička tvrtka.
Prilikom ugradnje i skidanja rezervnog dijela potrebno je poštivati upozorenja i sigurnosne upute uređaja u koji je rezervni dio ugrađen.
Upozorenje! Ako se staklo razbije, krhotine stakla mogu izazvati posjekotine, stoga je potrebno nositi osobnu zaštitnu opremu prilikom rukovanja rezervnim dijelom (zaštitne rukavice, zaštitne naočale)
Polish
ostrzeżenia dotyczące bezpieczeństwa produktu i informacje dotyczące bezpieczeństwa
Montaż i demontaż tej części zamiennej może być wykonywany wyłącznie przez specjalistyczną firmę elektryczną.
Podczas montażu i demontażu części zamiennej należy przestrzegać ostrzeżeń i wskazówek bezpieczeństwa urządzenia, w którym montowana jest część zamienna.
Ostrzeżenie! W przypadku stłuczenia szkła odłamki szkła mogą spowodować skaleczenia, dlatego podczas obchodzenia się z częścią zamienną należy nosić środki ochrony osobistej (rękawice ochronne, okulary ochronne)
Dutch
waarschuwingen en veiligheidsinformatie
De montage en demontage van dit reserveonderdeel mag uitsluitend worden uitgevoerd door een gespecialiseerd elektriciteitsbedrijf.
Bij het installeren en verwijderen van het reserveonderdeel moeten de waarschuwings- en veiligheidsinstructies van het apparaat waarin het reserveonderdeel wordt geïnstalleerd in acht worden genomen.
Waarschuwing! Als het glas breekt, kunnen glassplinters snijwonden veroorzaken. Daarom moeten bij het hanteren van het reserveonderdeel persoonlijke beschermingsmiddelen worden gedragen (veiligheidshandschoenen, veiligheidsbril)
Maltese
twissijiet dwar is-sigurtà tal-prodott u informazzjoni dwar is-sigurtà
L-installazzjoni u t-tneħħija ta’ din l-ispare part jistgħu jsiru biss minn kumpanija tal-elettriku speċjalizzata.
Meta tinstalla u tneħħi l-ispare part, għandhom jiġu osservati t-twissija u l-istruzzjonijiet tas-sigurtà tal-apparat li fih tkun installata l-ispare part.
Twissija! Jekk il-ħġieġ jinkiser, biċċiet tal-ħġieġ jistgħu jikkawżaw qatgħat, għalhekk għandu jintlibes tagħmir protettiv personali meta timmaniġġja l-ispare part (ingwanti protettivi, nuċċalijiet tas-sigurtà)
Romanian
avertismente privind siguranța produsului și informații de siguranță
Instalarea și demontarea acestei piese de schimb pot fi efectuate numai de o companie specializată în electricitate.
La instalarea și scoaterea piesei de schimb trebuie respectate instrucțiunile de avertizare și siguranță ale dispozitivului în care este instalată piesa de schimb.
Avertizare! Dacă geamul se sparge, așchiile de sticlă pot provoca tăieturi, de aceea trebuie purtat echipament individual de protecție la manipularea piesei de schimb (mănuși de protecție, ochelari de protecție)
Portuguese
avisos de segurança do produto e informações de segurança
A instalação e remoção desta peça sobressalente só podem ser realizadas por uma empresa elétrica especializada.
Ao instalar e remover a peça sobressalente, devem ser observadas as instruções de advertência e segurança do dispositivo no qual a peça sobressalente está instalada.
Aviso! Se o vidro quebrar, lascas de vidro podem causar cortes, portanto deve-se usar equipamento de proteção individual ao manusear a peça sobressalente (luvas de proteção, óculos de segurança)
Swedish
varningar och säkerhetsinformation
Installation och demontering av denna reservdel får endast utföras av en specialiserad elfirma.
Vid montering och demontering av reservdelen måste varnings- och säkerhetsanvisningarna för enheten i vilken reservdelen är monterad följas.
Varning! Om glaset går sönder kan glassplitter orsaka skärsår, så personlig skyddsutrustning måste bäras vid hantering av reservdelen (skyddshandskar, skyddsglasögon)
Slovak
varovania o produkte a bezpečnostné informácie
Inštaláciu a demontáž tohto náhradného dielu smie vykonávať len odborná elektrotechnická firma.
Pri montáži a demontáži náhradného dielu je potrebné dodržiavať výstražné a bezpečnostné pokyny zariadenia, do ktorého je náhradný diel inštalovaný.
POZOR! Ak sa sklo rozbije, úlomky skla môžu spôsobiť rezné rany, preto je potrebné pri manipulácii s náhradným dielom používať osobné ochranné prostriedky (ochranné rukavice, ochranné okuliare)
Spanish
advertencias de seguridad del producto e información de seguridad
La instalación y desmontaje de este recambio sólo podrá ser realizada por una empresa eléctrica especializada.
Al instalar y retirar la pieza de repuesto, se deben observar las instrucciones de advertencia y seguridad del dispositivo en el que se instala la pieza de repuesto.
¡Advertencia! Si el vidrio se rompe, las astillas de vidrio pueden provocar cortes, por lo que se debe utilizar equipo de protección personal al manipular el repuesto (guantes de protección, gafas de seguridad)
Slovenian
opozorila in varnostne informacije
Montažo in demontažo tega nadomestnega dela lahko izvede le specializirano elektro podjetje.
Pri vgradnji in demontaži rezervnega dela je treba upoštevati opozorila in varnostna navodila naprave, v katero je rezervni del nameščen.
Opozorilo! Če se steklo razbije, lahko drobci stekla povzročijo ureznine, zato je pri rokovanju z nadomestnim delom potrebna osebna zaščitna oprema (zaščitne rokavice, zaščitna očala)
Czech
varování a bezpečnostní informace
Montáž a demontáž tohoto náhradního dílu smí provádět pouze odborná elektrotechnická firma.
Při montáži a demontáži náhradního dílu je třeba dodržovat výstražné a bezpečnostní pokyny zařízení, do kterého je náhradní díl instalován.
Varování! Při rozbití skla mohou úlomky skla způsobit řezné rány, proto je nutné při manipulaci s náhradním dílem používat osobní ochranné prostředky (ochranné rukavice, ochranné brýle)
Hungarian
figyelmeztetések és biztonsági információk
Ennek a pótalkatrésznek a be- és kiszerelését csak elektromos szakcég végezheti.
A pótalkatrész be- és kiszerelésekor be kell tartani annak a készüléknek a figyelmeztetését és biztonsági előírásait, amelybe a pótalkatrészt beépítik.
Figyelmeztetés! Ha az üveg eltörik, az üvegszilánkok vágást okozhatnak, ezért az alkatrész kezelésekor egyéni védőfelszerelést kell viselni (védőkesztyű, védőszemüveg)


